Category Archives: Travel Guides

🇵🇭 Top Places Americans Must Visit in the Philippines (2025 Travel Guide)

✈️ Why Visit the Philippines?

With over 7,000 islands, the Philippines offers a stunning mix of white-sand beaches, volcanoes, mountains, and rich cultural experiences. For American travelers, it’s a friendly, English-speaking country, with affordable travel and non-stop flights from the US to Manila or Cebu.


🌴 Top Places Americans Must Visit in the Philippines

1. El Nido, Palawan – Paradise Found

By Philippine Fly Boy – Flickr: El NIDO, CC BY 2.0

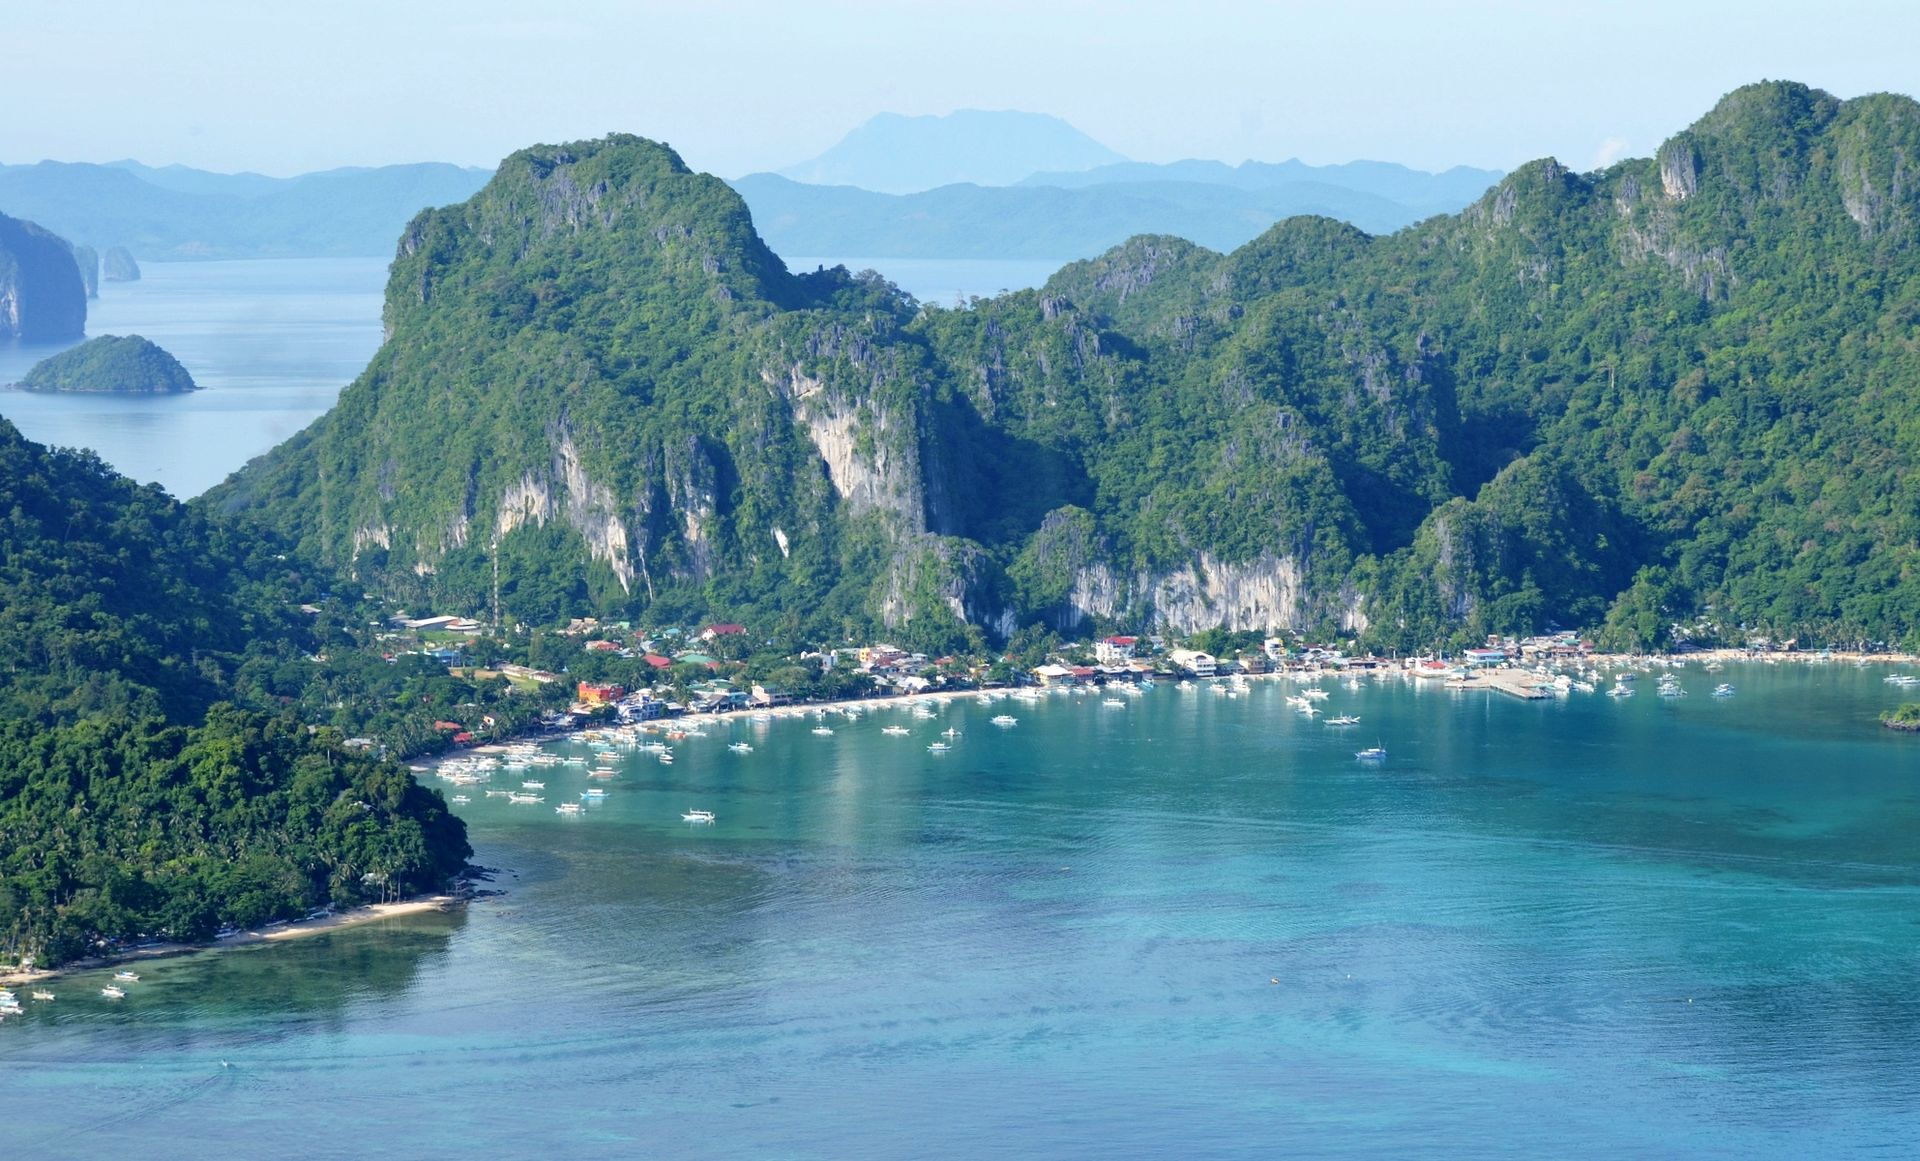
One of the most iconic beach destinations in the world, El Nido features limestone cliffs, turquoise lagoons, and secluded islands. Go island hopping in Bacuit Bay, snorkel in Secret Lagoon, and experience raw tropical beauty.

  • 🛫 Closest airport: Lio Airport (El Nido) or Puerto Princesa (5–6 hrs by van)
  • 🏨 Recommended stay: 3–5 days
  • 📸 Tip: Visit Small Lagoon and Big Lagoon early in the morning to avoid crowds

2. Banaue & Batad, Ifugao – The Ancient Rice Terraces

By Photo by CEphoto, Uwe Aranas or alternatively © CEphoto, Uwe Aranas, CC BY-SA 3.0,

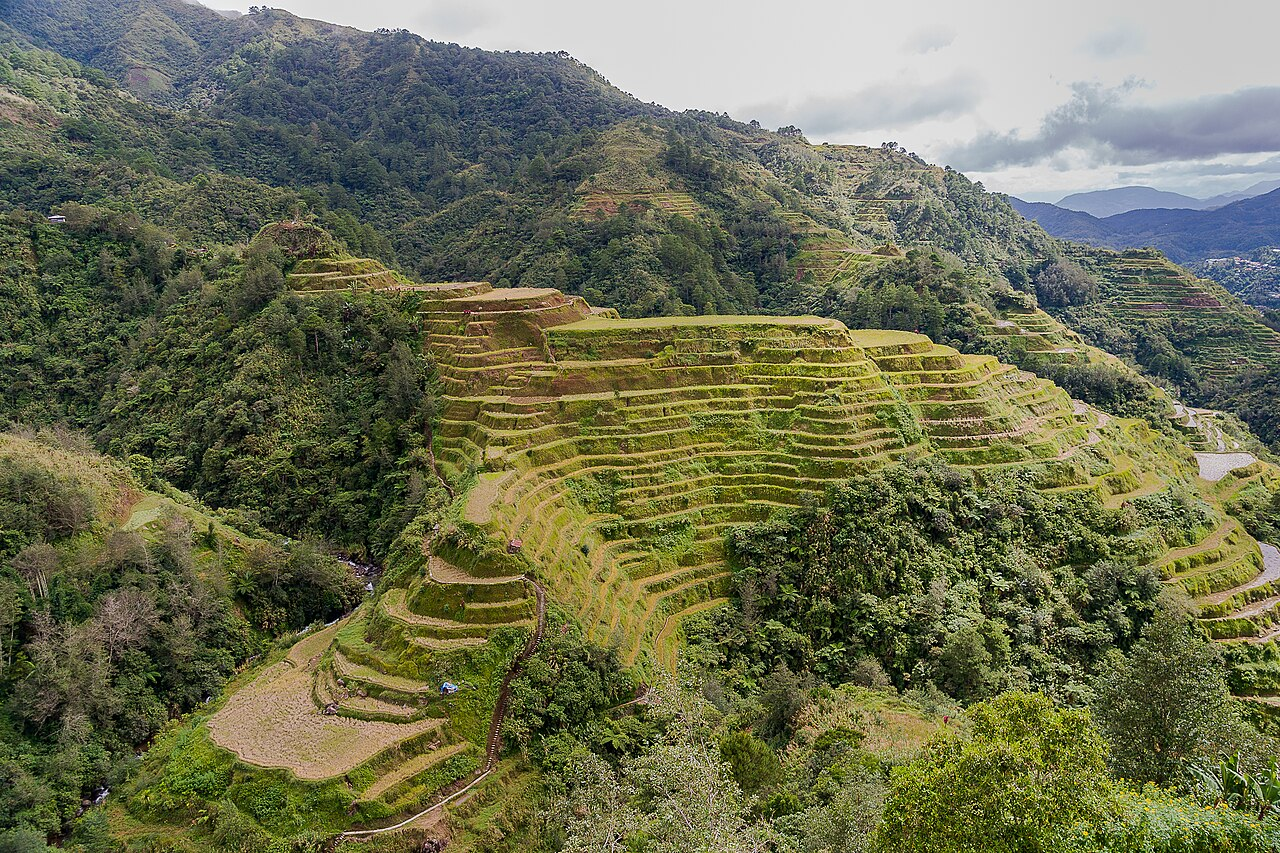
See the 2,000-year-old Banaue Rice Terraces, a UNESCO World Heritage Site. Americans looking for history, hiking, and authentic indigenous culture will love the peaceful highlands of Northern Luzon.

  • 🛫 Closest airport: Clark or Manila (then 9-hour bus ride)
  • 🥾 Tip: Take the hike to Batad village for jaw-dropping views

3. Cebu – History, Beaches & Whale Sharks

By Iszaid Bin Idris – Own work, CC BY-SA 4.0,

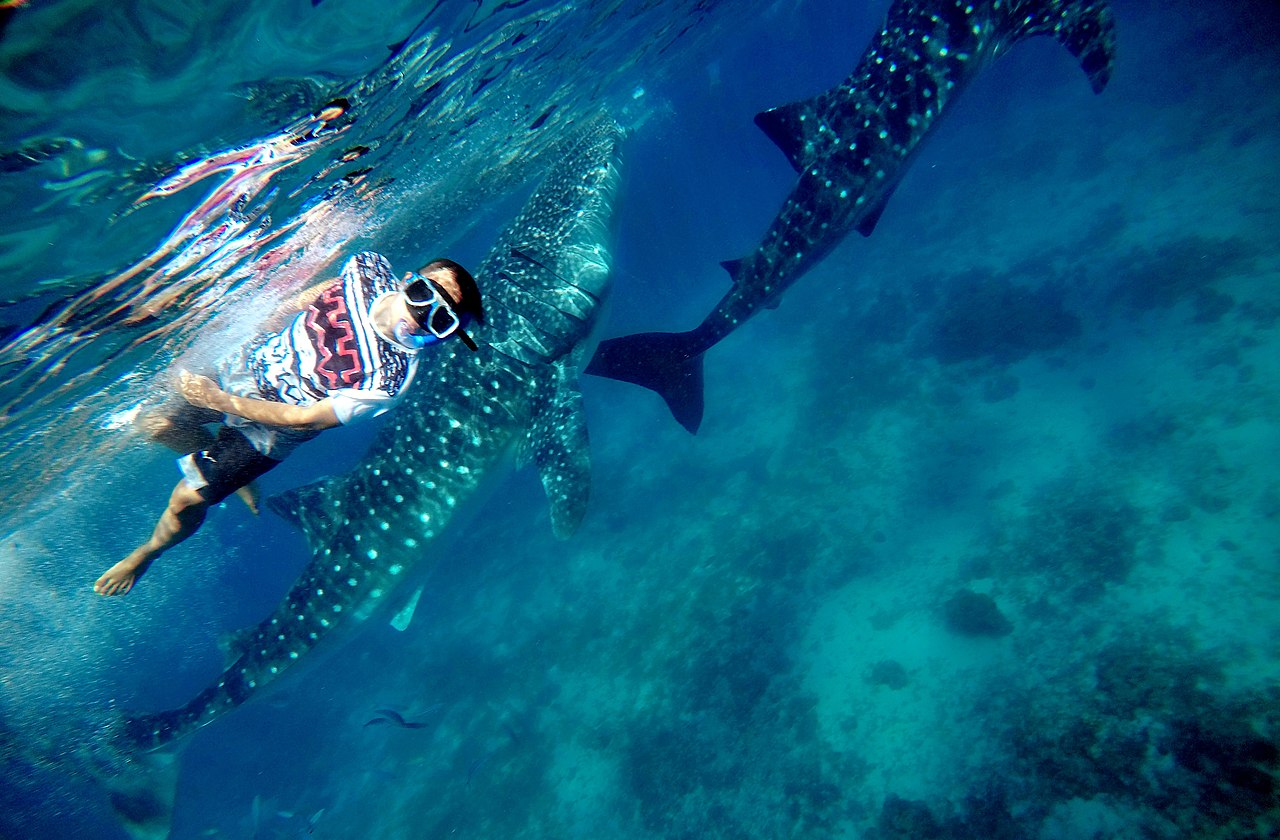
Cebu is a diverse destination offering a mix of city life, heritage sites, and natural attractions. Swim with whale sharks in Oslob, chase waterfalls in Kawasan, and visit Magellan’s Cross in Cebu City.

  • 🛫 Direct flights from the US (via Manila or Hong Kong)
  • 🐋 Don’t miss: Sardine run in Moalboal and canyoneering in Badian

4. Siargao Island – Surf, Serenity, and Secret Spots

By ChaasPrime – Own work, CC BY-SA 4.0,

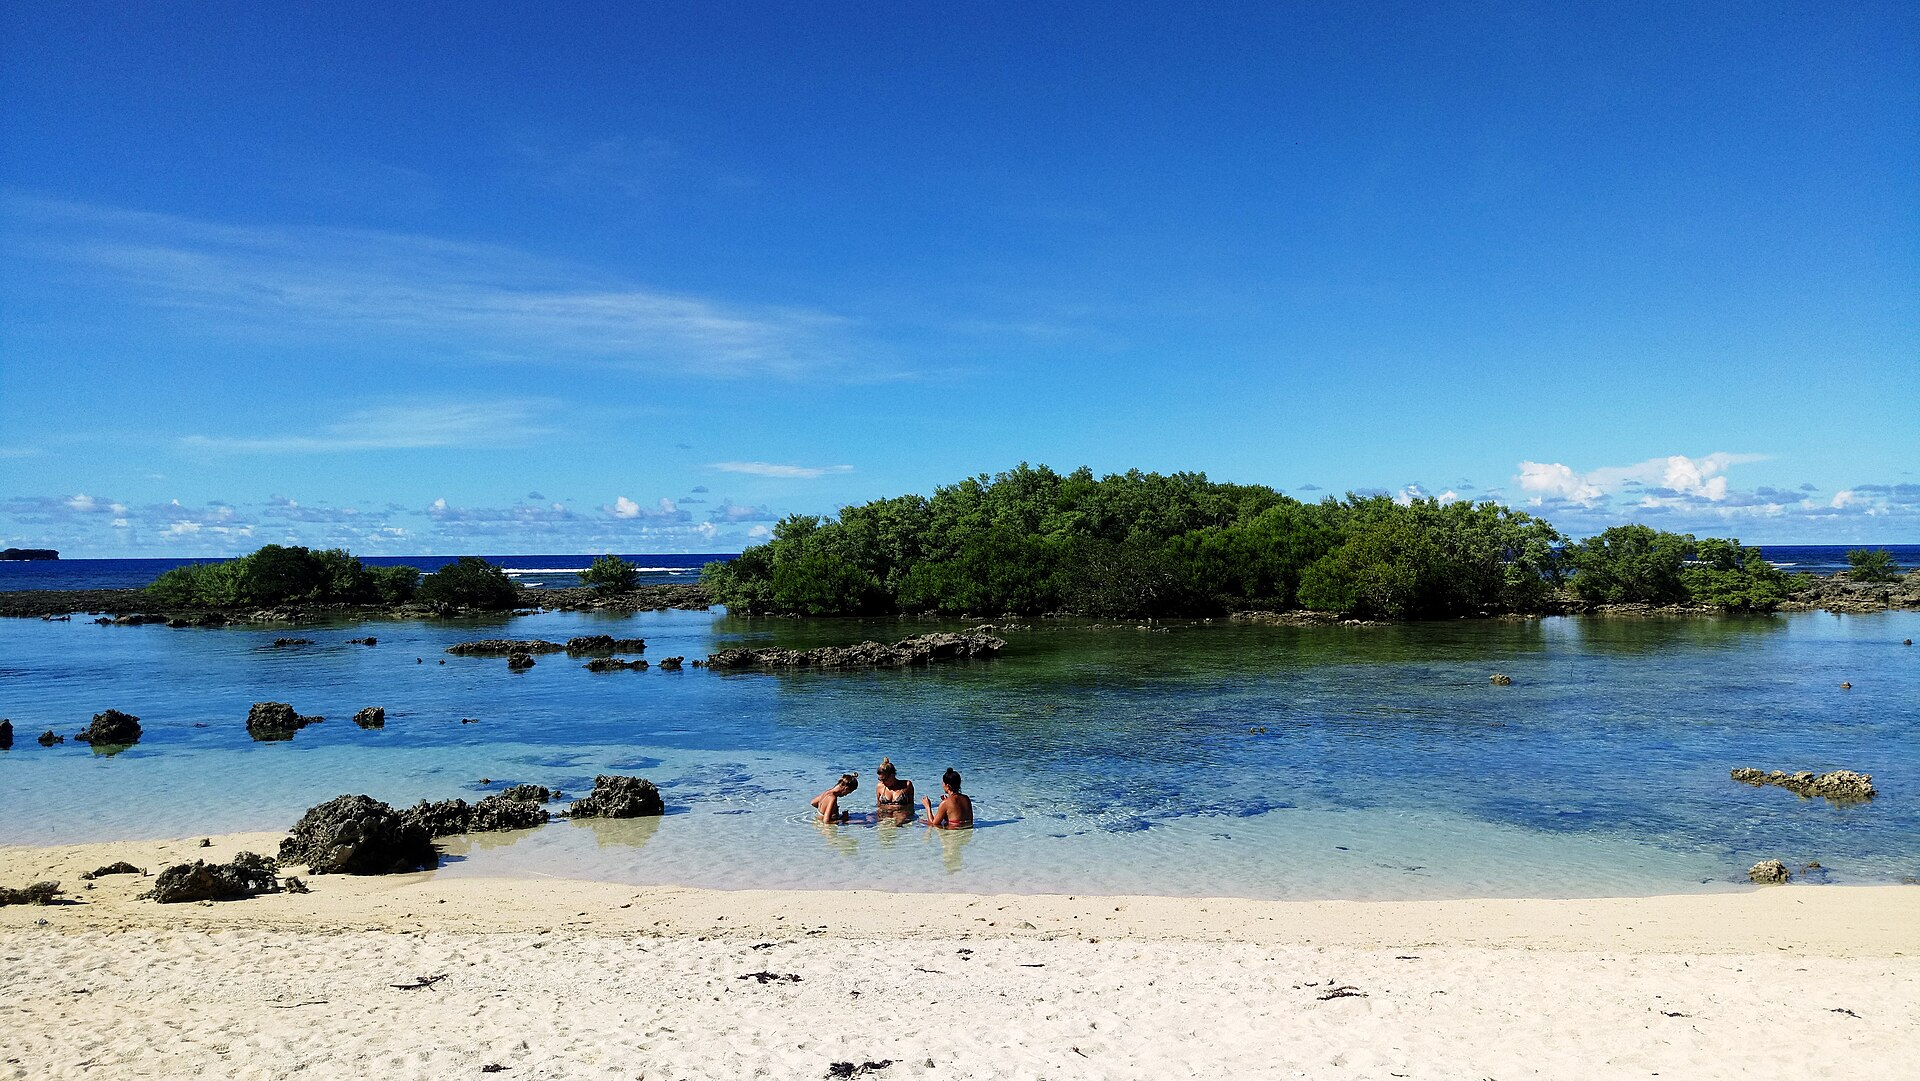
Known as the Surfing Capital of the Philippines, Siargao has grown into a haven for all kinds of travelers. Whether you surf or not, enjoy pristine beaches, Sugba Lagoon, and the laid-back island life.

  • 🛫 Closest airport: Sayak Airport (Siargao)
  • 🌊 Great for: Surfing, paddleboarding, and unplugging from city life

5. Vigan, Ilocos Sur – Spanish Colonial Charm

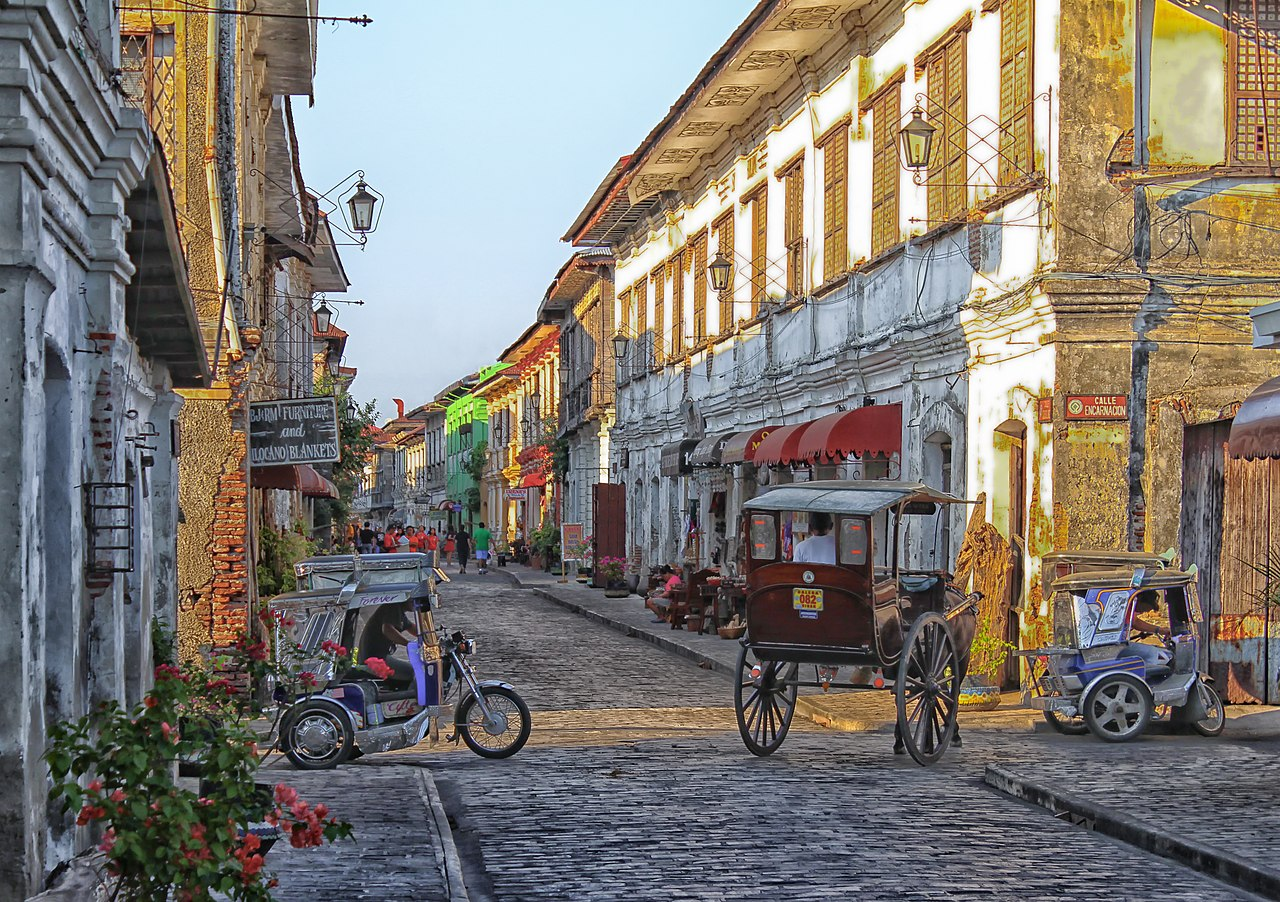
For a taste of old-world Philippines, visit Vigan, a UNESCO heritage town that looks frozen in time. Stroll down Calle Crisologo, ride a kalesa (horse-drawn carriage), and try local delicacies like empanada.

  • 🛫 Closest airport: Laoag or Manila (8-hour bus ride)
  • 🏛️ Best for: History buffs, photographers, and architecture lovers

6. Bohol – Chocolate Hills & Tarsiers

Bohol is famous for the unique Chocolate Hills and the world’s smallest primate, the Philippine Tarsier. It’s also home to white sand beaches, rivers, and adventure parks.

  • 🛫 Closest airport: Panglao International Airport
  • 🚣 Try: Loboc River cruise and zipline rides

7. Davao City & Samal Island – Culture Meets Nature

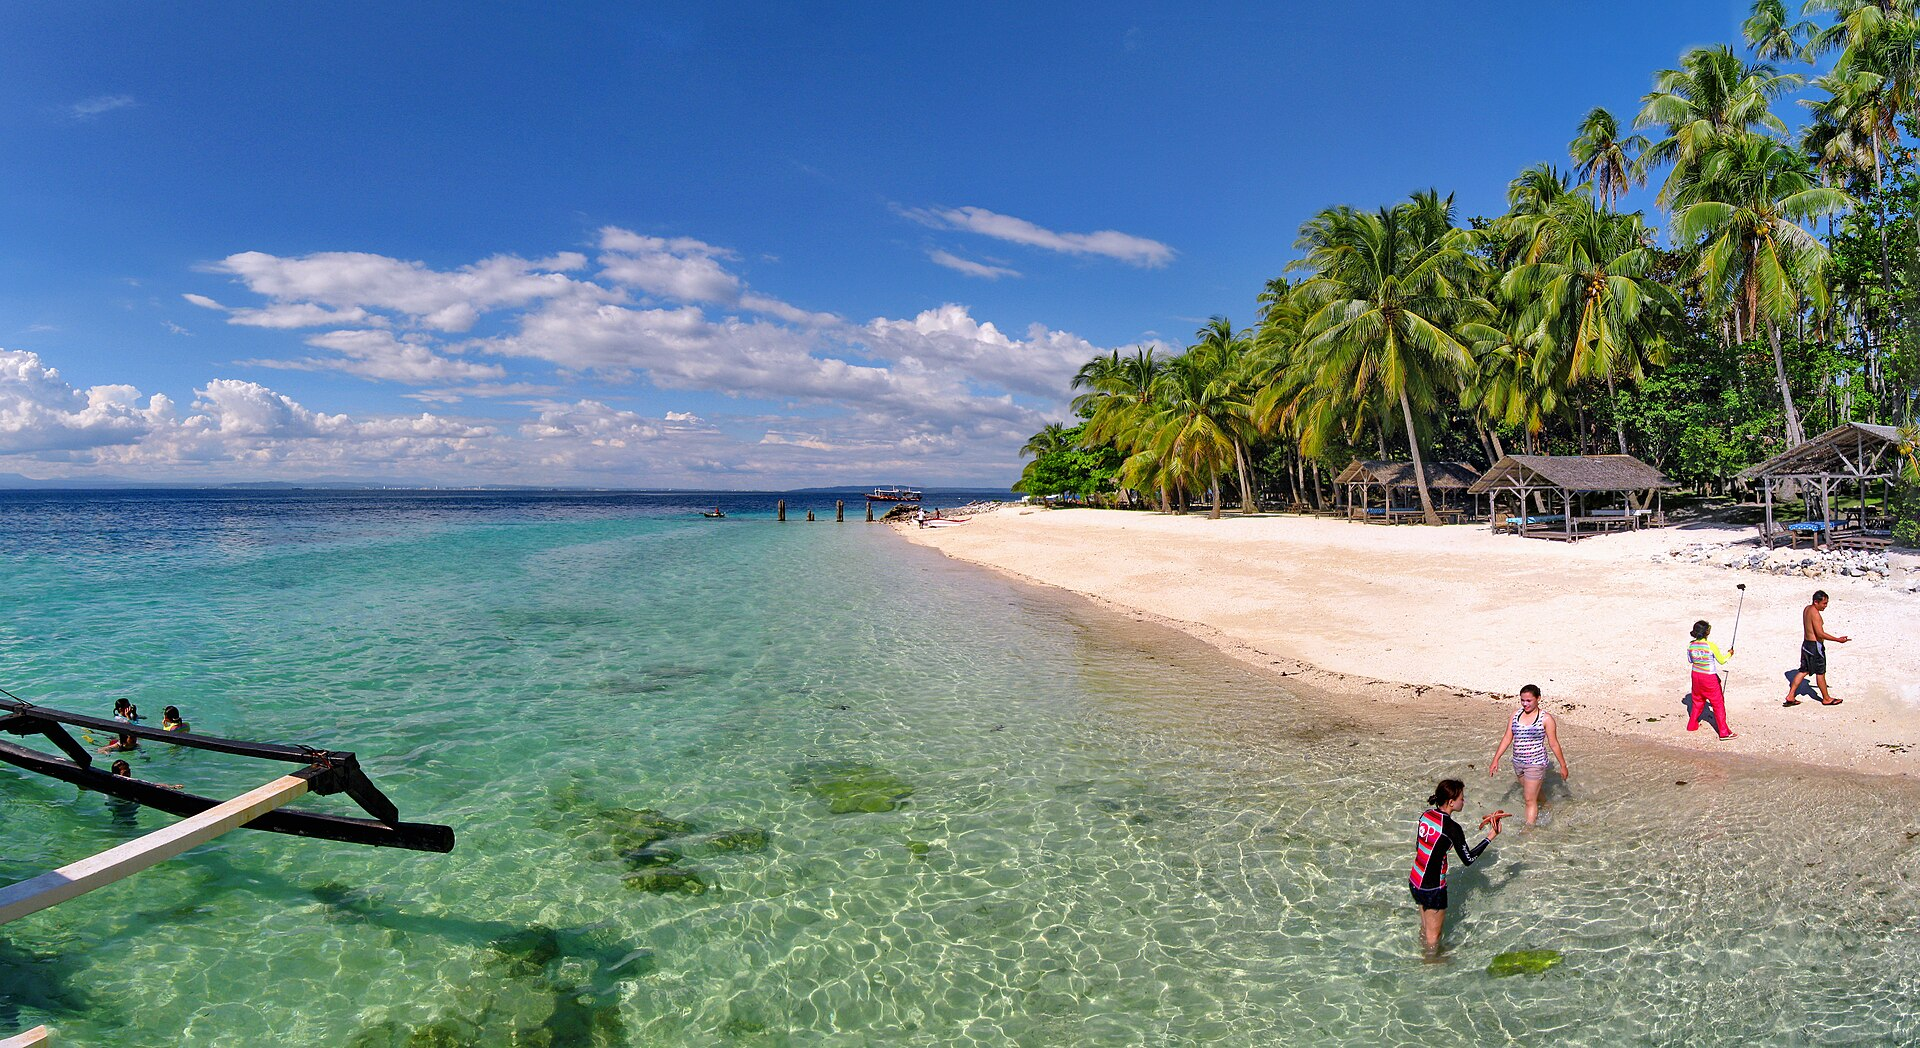
Davao, the hometown of Philippine eagles and durian, offers a great mix of culture, food, and adventure. Hop to Samal Island for beach resorts and snorkeling.

  • 🛫 Direct domestic flights from Manila & Cebu
  • 🦅 Must-see: Philippine Eagle Center and Mount Apo (highest peak in the country)

8. Coron, Palawan – Shipwreck Diving & Stunning Lakes

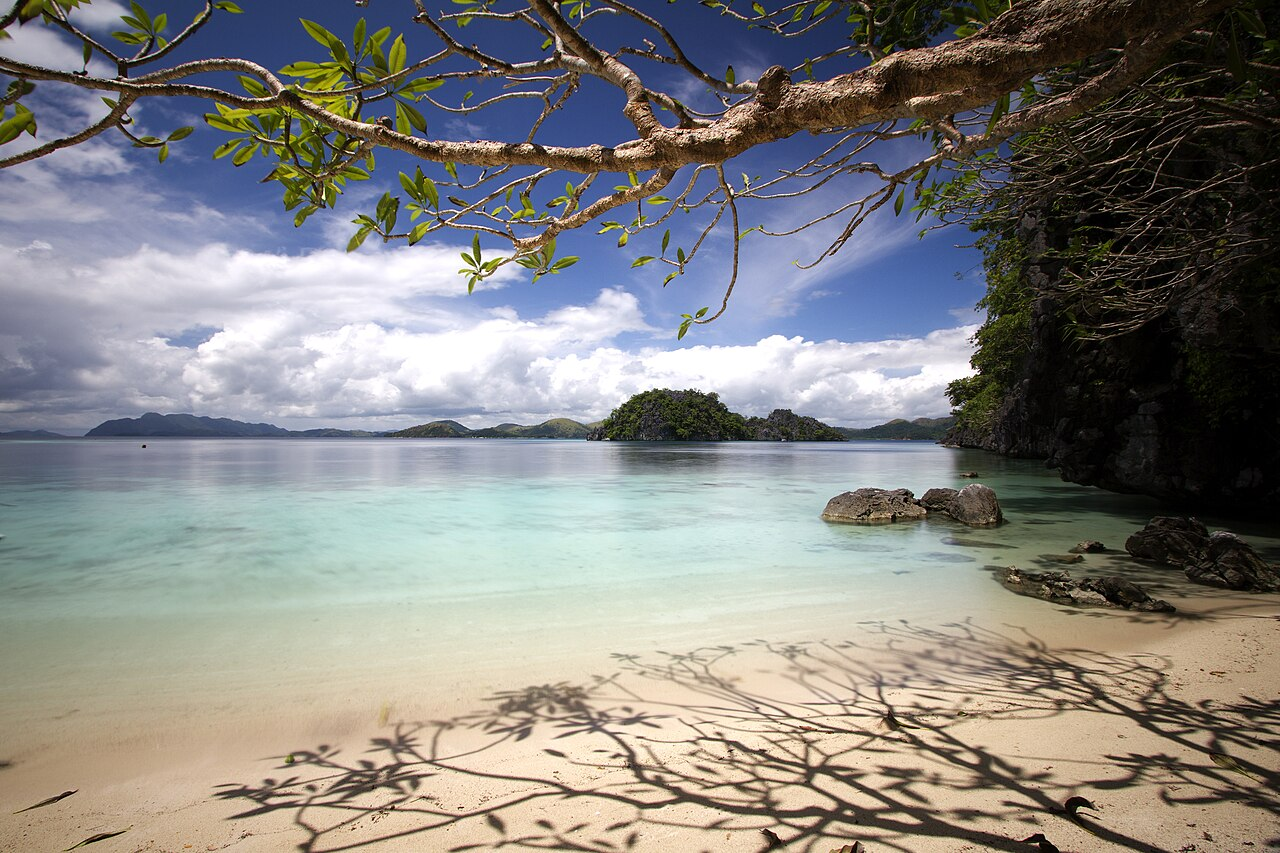
If you love diving, Coron is a dream. Explore WWII shipwrecks, Kayangan Lake, and Barracuda Lake—known for its surreal underwater thermoclines.

  • 🛫 Closest airport: Busuanga Airport (Coron)
  • 🤿 Top activity: Wreck diving and lake excursions

🗓️ Best Time for Americans to Visit the Philippines

SeasonMonthsNotes
Dry SeasonDecember–MayBest for beaches & island tours
Wet SeasonJune–NovemberFewer tourists, occasional typhoons

💸 Travel Tips for Americans

  • Visa-free stay: US passport holders can stay for up to 30 days visa-free
  • Currency: Philippine Peso (₱); $1 ≈ ₱56–₱58 (as of 2025)
  • Language: English is widely spoken—no language barrier
  • Transport: Domestic flights are cheap; ride-hailing apps like Grab work in cities

📌 Final Thoughts

The Philippines offers diverse experiences that cater to every kind of traveler—beach lovers, adventurers, history fans, and foodies alike. For Americans looking for an exotic, budget-friendly, and unforgettable destination in Asia, the Philippines is a must.

🧳 Pack your bags, book your flight, and discover why “It’s More Fun in the Philippines”.

How to Apply for a South Korean Visa for Filipinos (2025 Guide)

✈️ Why Visit South Korea in 2025?

South Korea continues to be a favorite destination for Filipino travelers thanks to its vibrant culture, K-dramas, K-pop, food, fashion, and historical landmarks. With travel back in full swing, it’s the perfect time to plan your 2025 South Korea trip — but first, you’ll need a visa!

📋 Types of South Korean Visas for Filipinos

For most Filipino tourists, the visa needed is the C-3 Tourist Visa. Other types include:

  • C-3-9: Short-term general visa (tourism, visiting friends, etc.)
  • C-3-1: Short-term business visa
  • Multiple-entry visa: For frequent travelers or those eligible under certain qualifications

🧾 South Korean Tourist Visa Requirements (2025)

Here’s a checklist of the basic requirements for Filipino applicants as of 2025:

✅ Basic Requirements:

  1. Visa Application Form – Fill out the South Korea Visa Application Form
  2. 1 Passport-sized Photo (white background, taken within 6 months)
  3. Original Philippine Passport
    • Valid for at least 6 months
    • With at least 2 blank pages
  4. Photocopy of Passport Bio Page
  5. Original and photocopy of PSA Birth Certificate (if first-time traveler)
  6. Marriage Certificate (if applicable)

✅ Financial Documents:

If Employed:

  • Original Certificate of Employment (with position, salary, and length of employment)
  • Latest Income Tax Return (ITR)
  • Bank Certificate
  • Bank Statement (last 3 months)

If Self-employed or Business Owner:

  • DTI/SEC Business Registration
  • Mayor’s Permit
  • Latest ITR
  • Bank Certificate and Statement

If Student:

  • School Certificate
  • School ID
  • Affidavit of Support from parents or sponsor
  • Parent’s financial documents

🧳 Optional but Helpful Documents

  • Certificate of Leave of Absence (for employees)
  • Travel Itinerary (especially for first-time applicants)
  • Hotel and flight bookings (optional but good to include)

💸 South Korea Visa Fees for Filipinos (2025)

Visa TypeDurationFee (PHP)
Single Entry (59 days or less)Short stayFREE (if applying directly)
Multiple Entry1–5 yearsPHP 4,050
Processing Fee (via agency)VariesPHP 1,000–2,500

Note: Visa is free if you apply directly at the Korean Embassy, but due to high demand, most applications must now be coursed through accredited travel agencies.

🏢 Where to Apply – Korean Visa Application Centers in the Philippines (2025)

As of 2025, Korean visa applications are handled through KVAC (Korea Visa Application Center):

Metro Manila

  • KVAC Taguig – Brittany Hotel, BGC
  • KVAC Makati – Address TBA (Check latest updates on KVAC Official Website)

Cebu

  • Newly opened KVAC Cebu branch to serve Visayas & Mindanao applicants

⏱️ Visa Processing Time (2025)

Application TypeProcessing Time
Regular Tourist Visa10–15 working days
Multiple-Entry Visa10–20 working days
Via Agency7–10 working days (depending on agency)

💡 Tips to Get Approved

  1. Submit complete and truthful documents – Double-check everything!
  2. Show strong financial capacity – A healthy bank balance helps.
  3. Have travel history – Previous travels to OECD countries (Japan, US, etc.) can boost your chance.
  4. Don’t submit fake documents – This can lead to blacklisting.
  5. Be consistent – Information on your application form and documents should match.

❓ Frequently Asked Questions (FAQs)

🔹 Is a visa required for Filipinos visiting Korea in 2025?

Yes, Filipino passport holders still need a visa to enter South Korea.

🔹 Can I walk in and apply directly?

No. As of 2025, walk-in applications are not allowed. You must book an appointment and apply via a KVAC-accredited agency.

🔹 How much money should I have in my bank?

There’s no official amount, but ideally at least PHP 50,000+ for a short trip. More if traveling longer or with family.

📍 Final Thoughts

Applying for a South Korean visa as a Filipino in 2025 is simpler than ever — as long as you’re prepared. Submit complete documents, choose a trusted travel agency if needed, and follow the guidelines strictly. Once approved, you’re one step closer to enjoying the sights of Seoul, Busan, Jeju, and more!

📌 Don’t Forget to Bookmark and Share!

Share this 2025 South Korean Visa Guide with your fellow K-drama and K-pop fanatics! 🇰🇷💜

How to Apply for a Qatar Transit Visa via Qatar Airways (For Filipinos with a Layover in Doha)

✈️ Planning a Layover in Doha? Here’s How Filipinos Can Apply for a Qatar Transit Visa via Qatar Airways

If you’re a Filipino traveler flying with Qatar Airways and have a long layover in Doha, why not turn it into an opportunity to explore Qatar? Thankfully, Qatar offers a free transit visa for eligible passengers — including Philippine passport holders — provided you meet certain requirements. Here’s a step-by-step guide on how to apply for a Qatar transit visa via Qatar Airways.

🛂 What is the Qatar Transit Visa?

The Qatar Transit Visa is a free visa offered by the Qatari government in coordination with Qatar Airways. It allows passengers with layovers between 5 and 96 hours to enter Qatar and explore the city of Doha instead of staying inside the airport.

Visa Fee: FREE
🕐 Validity: 5 to 96 hours
📍 Eligibility: Must be flying with Qatar Airways on both legs of your journey

🇵🇭 Are Filipinos Eligible?

Yes! As a Philippine passport holder, you are eligible to apply for the Qatar Transit Visa as long as you meet the following conditions:

  • Your layover in Doha is between 5 and 96 hours
  • You are flying with Qatar Airways only (not mixed carriers)
  • You apply for the visa at least 7 days before your departure

📝 Requirements for Filipino Travelers

Here are the documents you’ll need to prepare:

  • A valid Philippine passport (at least 6 months before expiration)
  • A confirmed Qatar Airways ticket with a stopover in Doha (5–96 hours)
  • A confirmed onward ticket to a third country
  • Hotel booking in Qatar (if staying overnight)
  • Transit visa application via Qatar Airways website

🔗 How to Apply for a Qatar Transit Visa (Step-by-Step)

Step 1: Book Your Flight with Qatar Airways

Ensure that both your arrival and departure flights to/from Doha are operated by Qatar Airways.

Step 2: Go to the Qatar Airways Transit Visa Page

Visit the official Qatar Airways Transit Visa portal or directly through their “Manage Booking” feature.

Step 3: Submit the Visa Application

Apply at least 7 days before departure (but not more than 90 days). You’ll need to:

  • Log in with your booking reference number
  • Fill out the online visa application form
  • Upload your passport and flight details
  • Upload hotel booking confirmation if applicable

Step 4: Wait for Approval

You will receive a response via email within a few business days. If approved, download and print your transit visa to bring with you during your trip.

🏨 Optional: Book a Transit Hotel with Qatar Airways

If your layover includes an overnight stay, you can also book a hotel in Doha through the Qatar Airways Stopover Program, which offers discounted or even free hotel stays for eligible itineraries.

More info here: https://www.qatarairways.com/en/offers/stopover-in-qatar.html

💡 Tips Before You Travel

  • Your visa is only valid once – make sure you don’t leave the airport unless you’re planning to use the layover to explore Doha.
  • Stay updated with entry rules and health regulations (especially if there are COVID-19 or travel health protocols).
  • Use your layover to visit iconic spots like the Museum of Islamic Art, Souq Waqif, or take a short desert safari.

📌 Final Thoughts

The Qatar Transit Visa is an excellent way for Filipinos to make the most of a long layover in Doha. Whether you want to explore the city or just enjoy a comfortable rest between flights, this free visa option makes your journey more enjoyable — and memorable!

💬 Have You Tried the Qatar Transit Visa?

Let us know in the comments below! And don’t forget to share this guide with fellow Filipino travelers who might benefit from a Doha stopover.

How to Apply for an Australian Tourist Visa in the Philippines (2025 Step-by-Step Guide)

If you’re a Filipino planning a vacation to Australia, the first thing you need is a valid Australian Visitor Visa (subclass 600). This visa allows you to visit Australia for tourism, to see family or friends, or for short-term non-work purposes. Here’s your updated 2025 guide to applying for an Australian Tourist Visa from the Philippines.

✅ Who Needs an Australian Tourist Visa?

Philippine passport holders must apply for a Visitor visa (subclass 600) before entering Australia. The visa is typically valid for 3, 6, or 12 months, depending on the case.

📋 Step-by-Step Guide to Apply for an Australian Tourist Visa (2025)

Step 1: Create an ImmiAccount

The entire visa application is processed online via the Australian Government’s Department of Home Affairs website.

Tip: Use a working and frequently-checked email as all communications will be sent here.

Step 2: Prepare the Required Documents

Here’s a list of common requirements for a tourist visa (subclass 600):

Personal Documents:

  • Valid Philippine passport (must be valid for at least 6 months)
  • Passport-size photo (45mm x 35mm, white background)
  • Birth certificate (PSA-issued)
  • Valid IDs (government-issued)

Financial Proof:

  • Bank statements (last 3 months)
  • Certificate of employment (with leave approval)
  • Payslips (last 3 months)
  • Income tax return (ITR)

Travel Plans:

  • Travel itinerary (not mandatory, but helpful)
  • Hotel bookings (or invitation letter if staying with a friend/family)
  • Roundtrip flight reservation (optional but recommended)

Supporting Documents (if applicable):

  • Invitation letter from Australian sponsor
  • Copy of sponsor’s passport/visa
  • Evidence of relationship to sponsor

Note: All documents must be scanned and uploaded in PDF or JPG format.

Step 3: Start Your Online Application

Once your documents are ready:

  • Log in to your ImmiAccount
  • Select “New Application” > “Visitor” > “Visitor Visa (600)”
  • Choose the “Tourism” stream
  • Fill in all required personal, travel, and background information

Important: Be honest with your answers. Misrepresentation may lead to visa refusal.

Step 5: Pay the Visa Fee

As of 2025, the Visitor visa (subclass 600) application fee is approximately AUD 190 (subject to currency conversion). Payment can be made via:

  • Credit/debit card
  • PayPal

Once payment is successful, you’ll receive a Transaction Reference Number (TRN). Save this for tracking your application.

Step 6: Biometrics Appointment (if required)

After submission, you might receive a Biometrics Request.

If so, you’ll need to book an appointment at a VFS Global center:

📍 VFS Global – Manila
Mezzanine Floor, Ecoplaza Building, Don Chino Roces Ave., Makati City

📍 VFS Global – Cebu
9th Floor, Keppel Center, Cebu Business Park, Cebu City

  • Bring your passport and Biometrics Instruction Letter (BIL)
  • Pay the biometric service fee (approx. PHP 900+)

Step 7: Wait for the Visa Decision

Processing times can vary. On average, tourist visa applications from the Philippines take:

  • 15 to 30 working days, depending on individual circumstances.

You will receive an email notification with the decision. If approved, your visa grant notice will include:

  • Visa grant number
  • Entry conditions
  • Validity dates

Note: No visa sticker is placed on your passport. It’s all electronic.

✅ Tips for a Successful Application

  • Show strong ties to the Philippines (job, family, properties, etc.)
  • Provide clear proof of financial capacity
  • Avoid submitting fake documents
  • Apply at least 2 months before your travel date

✈️ Ready to explore Australia?

Start your application today and enjoy the beauty of Sydney, Melbourne, the Great Barrier Reef, and more! 🇦🇺🌏

How and Where to Apply for an Italy Schengen Visa in the Philippines – 2025 Guide

If you’re dreaming of Italy’s historic piazzas, art, and cuisine, you’ll need a Schengen Visa as a Philippine passport holder. Fortunately, the application process is straightforward—especially when you follow this updated 2025 guide.

Where to Apply: Italy Visa Application Centers Across the Philippines

You cannot submit a Schengen visa application directly at the Italian Embassy unless it’s for diplomatic or adoption cases. In fact, all tourist, business, and family visa requests are handled by VFS Global via their Visa Application Centers (VACs):

  • Manila (Taguig): Ground Floor, One Campus Place Bldg A, McKinley Town Center, Fort Bonifacio, Taguig City
  • Cebu: Unit 1001C & 1004B, 10th Floor, Kepwealth Center, Samar Loop cor Cardinal Rosales Ave, Cebu City
  • Batangas City: LS‑18, Ground Floor, Xentro Mall Batangas Terminal, Alangilan, Batangas City
  • Davao: FES 08, 2nd Floor, Alfresco Area, Felcris Centrale, Quimpo Blvd, Davao City

For diplomatic/adoption visa purposes only, you may contact the Italian Embassy in Manila:
5/F Tower B, One Campus Place, McKinley Hill, Taguig City – by appointment via email.

You can walk in to VFS without an appointment—there is an additional fee for this service. But online appointment booking is strongly recommended via the VFS website.

Step-by-Step Application Process

1. Book Your Appointment

  • Create an account on the VFS Global portal and choose your preferred date and center.
  • Appointments typically open up to six months before travel.
  • While walk-ins are accepted, it’s safer to book online to avoid delays.

2. Prepare Required Documents

Make sure to organize originals and photocopies of the following:

  • Schengen visa application form, fully completed
  • 1 passport-sized photo (white background; ears visible)
  • Current passport (valid at least 3–6 months beyond stay)
  • Copies of previous passports and visas
  • Proof of travel: flight reservation, itinerary
  • Proof of accommodation: hotel bookings or invitation (“Dichiarazione Garanzia e/o Alloggio”)
  • Travel health insurance: €30,000 minimum, covering entire Schengen area plus 15 days extra
  • Proof of financial means: bank statements (3–6 months), credit card statements, bank certificates, etc.
  • Proof of ties to the Philippines: e.g., employment documents, real estate, family certificates
  • Proof of occupation:
  • Employed: Certificate of Employment, leave, ITR
  • Self-employed: business registration, financials
  • Student: Enrollment certificate, school leave

3. Attend Your VFS Appointment

  • Arrive early—bring originals, photocopies, and all documents.
  • Submit your application and pay:
    • Schengen visa fee: approx. €90 (~PHP 5,650) (adults)
    • Reduced fee: ~€45 (~PHP 2,827) for ages 6–12; free for under 6
    • VFS service fee: approx. PHP 1,759
    • Your biometrics (fingerprints and photo) will be taken (mandatory from January 2025), and stored in the system for 59 months—no need to repeat for future applications.

4. Track and Wait

  • Processing typically takes up to 15 calendar days, but may extend to 30 days if needed.
  • VFS provides tracking via SMS or online portal.
  • Travelers report varying timelines—from 10 days to over a month.

5. Collect Your Passport

  • You’ll be notified when your passport is ready. You can pick it up at your chosen VFS center.
  • If authorizing someone else to collect, be sure to ask what documents they need (e.g., authorization letter, receipt, ID).

Final Tips for a Smooth 2025 Application

  • Apply as early as possible, especially during high season.
  • Double-check all documents for completeness and consistency.
  • Choose funds that are stable, regular—you don’t need massive deposits but avoid red flags like lump sums.
  • Expect variation in processing times—plan travel after considering potential delays.

Applying for a visa can feel overwhelming, but with the right preparation and a clear plan, you’re already halfway there. Whether you’re heading to Rome, Venice, Florence, or the Amalfi Coast, Italy is worth every step of the process.

Take your time, double-check your documents, and give yourself plenty of lead time before your intended travel date. And most importantly—stay calm, stay organized, and stay excited.

Buona fortuna (good luck) with your application—and may your Italian adventure become one for the books!

How and Where to Apply for a Schengen Visa (Spain) in Manila – A Complete Guide for Filipino Travelers (2025)

Spain is one of the most popular destinations in Europe for Filipino travelers—whether you’re heading there for tourism, business, or to visit family. If you’re a Philippine passport holder, you’ll need to apply for a Schengen Visa before you can enter Spain

In this blog post, I’ll walk you through the step-by-step process of applying for a Spain Schengen Visa via the Spanish Embassy in Manila, including where to book an appointment, what documents to prepare, and what to expect.

📍 Where to Apply for a Spain Schengen Visa

The Spanish Embassy in Manila does not accept direct walk-in visa applications. All short-stay Schengen visa applications for Spain must be submitted through BLS International, the official outsourcing partner of the Spanish Embassy in the Philippines.

✔️ BLS Spain Visa Application Center – Manila

🗓️ Step 1: Book an Appointment Online

To submit your application, you must book an appointment in advance through the BLS website:

👉 Go to: https://ph.blsspainvisa.com
👉 Create an account and select a time slot
👉 Print your appointment confirmation

💡 TIP: Appointments fill up fast, especially during travel season. Book at least 3 to 4 weeks in advance.

🧾 Step 2: Prepare Your Documents

Make sure to gather all required documents before your appointment. Here’s what you’ll need:

📝 Basic Requirements:

  • Completed Schengen Visa application form
  • Recent passport-sized photo (35x45mm, white background)
  • Valid passport (at least 3 months beyond your stay)
  • Photocopy of passport (data page + previous visas)

✈️ Travel Documents:

  • Flight reservation (dummy booking is acceptable)
  • Hotel booking or accommodation proof
  • Travel insurance (coverage of at least €30,000 for entire Schengen area)

💰 Proof of Financial Means:

  • Bank statements for the past 3 months
  • Bank certificate
  • Employment certificate or business documents
  • Income Tax Return (ITR)

📄 Supporting Documents:

  • Cover letter (explain purpose of travel and travel itinerary)
  • If employed: COE, payslips, approved leave
  • If self-employed: Business permits, DTI/SEC registration
  • If student: School ID, proof of enrollment
  • If sponsored: Affidavit of support and sponsor’s documents

💵 Step 3: Pay the Fees

Visa and service fees must be paid in cash during your appointment:

Fee TypeAmount
Visa Fee (Adult)€90 (₱~5,500)
BLS Service Fee₱1,030
Optional Add-ons (SMS, courier, photocopy)Additional charges

🏢 Step 4: Go to Your BLS Appointment

  • Arrive at least 15 minutes early
  • Bring all original and photocopied documents
  • Dress smartly and follow all instructions inside the visa center
  • Your biometrics (photo and fingerprints) will be taken

🧍‍♂️ Companions are generally not allowed unless necessary (e.g., minors or PWD)

⏳ Step 5: Wait for Processing

Visa processing usually takes 7 to 15 working days, but can extend up to 30+ days depending on your case.

Track your application via the BLS tracking tool or via SMS if you availed of the update service.

📦 Step 6: Collect Your Passport

You’ll be notified once your passport is ready for pickup. Collection is usually between 2:00 PM and 4:00 PM on weekdays.

If someone else will collect it for you, they must bring:

  • Authorization letter
  • Your original receipt
  • Photocopy of their valid ID

🛑 Common Reasons for Rejection

Avoid these common pitfalls:

  • Incomplete documents
  • Insufficient funds or bank history
  • Invalid or missing insurance
  • Vague purpose of travel

✅ Always ensure consistency across your documents—especially your itinerary, bookings, and employment records.

✨ Final Tips

  • Apply at least 3 weeks in advance
  • Double-check document requirements via the official BLS website
  • Bring extra photocopies just in case
  • Keep your communication clear and confident

📣 Need Help?

If you’re unsure about your application, you can consult travel agencies or visa assistance services. Just make sure they’re reputable.

Or, visit the official Spanish Embassy website for updates:
👉 https://www.exteriores.gob.es/Embajadas/Manila/en/

🎒 Ready to Explore España?

Now that you know the process, it’s time to gather your documents, book that appointment, and start planning your Spanish adventure. ¡Buen viaje!

How to Secure an AOSG (Affidavit of Support & Guarantee) for Filipino Tourists: A 2025 Guide

If you’re traveling abroad soon and someone is sponsoring your trip, Philippine immigration may require an Affidavit of Support & Guarantee (AOSG). This document helps show you won’t become a burden while abroad and addresses anti-trafficking concerns.


What Exactly Is an AOSG?

An AOSG is a sworn statement from your sponsor—relative, friend, or entity abroad—promising to cover your expenses (airfare, lodging, daily costs) and ensure your return to the Philippines. Immigration may ask for it if they find your personal financial documents insufficient.


When Is an AOSG Typically Required?

  • First-time travelers or those without strong financial proof.
  • Tourists visiting family or friends abroad.
  • Minors traveling without their parents.
  • Any traveler deemed “high risk” by immigration (e.g., insufficient funds).

Required Elements of an AOSG

Your AOSG should include:

  • Sponsor’s details (name, nationality, relationship, connection to traveler).
  • Traveler’s details and purpose of travel.
  • Statement of financial support and guarantee.
  • Notarial acknowledgment (notarized in the Philippines or abroad).
  • Supporting documents:
    • Sponsor’s passport/ID, financial proof (bank statements, payslips, etc.).
    • Proof of relationship (birth or marriage certificates) if relative.
    • Return airline ticket.

Notarization & Authentication Rules

If the sponsor is abroad, the AOSG must be:

  • Notarized by the local Philippine Embassy/Consulate or a public notary abroad, then authenticated or apostilled.
  • If executed in the Philippines, simply notarized by a licensed notary. There’s no need for authentication by embassies.

Step-by-Step: How to Get Your AOSG

  1. Have the sponsor draft and sign the AOSG following the format above.
  2. Include required supporting documents (passports, financial proof, travel itinerary).
  3. Notarize:
    • Locally: visit a Philippine notary public.
    • Abroad: go to a Philippine embassy/consulate for notarization and authentication/apostille.
  4. Send the ORIGINAL signed and authenticated document to the traveler—for presentation to immigration.

Real-Life Insights

> “I used a public notary here in Japan, then had the embassy notarize and apostille it. The physical copy was needed at NAIA just in case.”* — Reddit user

> “Some passengers said they weren’t asked for the AOSG—but it still helps to bring one, especially if you’re sponsored.” — Reddit user


TL;DR Quick Summary

ScenarioRequirement
Self-funded, with proof of fundsAOSG usually not needed
Sponsored by local Philippine sponsorNotarized AOSG is helpful but not required by BI
Sponsored by someone abroadNotarized + authenticated AOSG strongly recommended
No proof of funds or first-time travelerAOSG may be demanded at immigration exit

Final Thoughts

An AOSG isn’t a standalone visa document, but it can be your safety net—especially if you’re traveling with sponsorship or limited funds. Secure it early and travel confidently!

How to Write a Visa Cover Letter That Works – Tips for Filipino Travelers

📄 Why Your Visa Cover Letter Could Make or Break Your Application?

Applying for a tourist or immigration visa? Many Filipino travelers underestimate the power of a well-written visa cover letter—also known as a letter of intent. But in reality, it could be the extra push you need for visa approval.

Whether you’re applying for a Schengen, U.S., UK, Canada, Japan, or Korea visa, a strong cover letter can help explain your purpose, intentions, and ties to the Philippines in a personal and persuasive way.


🎯 What Is a Visa Cover Letter?

A visa cover letter is a one-page formal document that accompanies your application. It explains:

  • ✅ Your travel purpose
  • ✅ Trip duration and itinerary overview
  • ✅ Who will fund your trip
  • ✅ Your strong ties to the Philippines (family, job, business, etc.)
  • ✅ A polite request for visa approval

🇵🇭 Why It’s Important for Filipinos

Filipino passport holders often face stricter visa scrutiny due to higher rates of overstay or illegal work abroad. Your cover letter can serve as your voice—providing context and intent that documents alone can’t show.

It helps:

  • 📌 Show that your visit is temporary and purposeful
  • 📌 Address possible red flags (e.g. unemployed sponsor, frequent travel, etc.)
  • 📌 Highlight strong ties (like a permanent job, enrolled school, or business)

📝 What to Include in Your Cover Letter

Here’s a simple structure:

  1. Header: Your name, address, contact info, and date
  2. Embassy/Consulate address
  3. Subject: Visa application – [Tourist/Visit/Student/Etc.]
  4. Opening greeting (e.g., Dear Visa Officer)
  5. Introduction – Who you are, your travel purpose, and basic trip details
  6. Trip explanation – dates, destinations, who you’re traveling with
  7. Financial support – who’s paying for the trip and their relationship to you
  8. Proof of ties – explain why you’ll return (work, family, etc.)
  9. Closing request for visa approval, thank them for their time
  10. Sincerely, Your full name and signature

📌 Sample Cover Letter Snippet


Dear Visa Officer,

My name is Juan Dela Cruz, a full-time employee at ABC Corporation in Makati, Philippines. I would like to apply for a tourist visa to visit Japan from December 1 to December 8, 2025. The purpose of my trip is leisure and cultural exploration. I plan to visit Tokyo, Kyoto, and Osaka.

All travel expenses will be covered by me, and I have attached my bank certificate and employment certificate as proof of financial capacity and strong ties to my country.

I respectfully request that you consider my application. I assure you that I will comply with all visa conditions and return to the Philippines as scheduled.

Sincerely,
Juan Dela Cruz

💬 Final Thoughts

A visa cover letter might not be officially required—but for Filipino applicants, it’s your best chance to humanize your application and show that you’re a genuine visitor. Write it carefully, submit it confidently, and let it support your documents with a strong narrative.

Need a custom cover letter template for your visa type? Let us know in the comments!

🆕 Latest 2025 Updates on U.S. Visa Applications for Filipinos

Applying for a U.S. visa from the Philippines? You’ll need to stay updated—2025 brings major changes that could affect your application. Here’s what’s new and how to prepare:

1. Social Media Must Be Public for F, M & J Visa Applicants

As of June 2025, Filipino applicants for F (student), M (vocational), or J (exchange visitor) visas must set their social media profiles to public to allow U.S. Embassy vetting. Inaccessible profiles can lead to delays or even visa denials.

2. Separate Biometrics Appointment Now Standard

Starting early 2025, the U.S. Embassy in Manila mandates a separate biometrics visit at the Visa Application Center (VAC) before the visa interview. This means two appointments—one for photos/fingerprints and another for the consular interview. Experienced applicants should note this when planning travel for these steps.

3. Updated Immigrant Visa Interview Requirements

From May 19, 2025, the embassy has begun canceling interviews if applicants don’t bring all necessary original documents. Missing even one document can push your appointment back by months, potentially affecting eligibility timelines and legal provisions.

4. New U.S. Immigration Fee in the Works

On July 11, 2025, USCIS announced plans for additional fees on select immigration benefit applications. The affected categories and fee amounts are still pending. Stay tuned for updates if you’re applying for immigrant or other benefit visas.

5. Stricter Screening for Family-Based Visa Applications

Effective August 1, 2025, USCIS implemented tighter vetting and interview rules for family immigration petitions. These changes aim to reduce fraud and ensure legitimacy in family-based visa applications.


💡 Quick Summary Table

UpdateKey Change
Social Media ScreeningF/M/J applicants must make profiles public
Biometrics AppointmentSeparate VAC visit required before interview
Interview FinesNo originals = canceled/rescheduled interview
New USCIS FeesUpcoming fees for certain applications
Family Visa ChangesStricter vetting for family-based visas

Tips to Stay Ahead of the Curve

  • Double-check social media settings before submitting your DS‑160.
  • Schedule your biometrics and interview well in advance, especially if you’re outside Metro Manila.
  • Prepare all original documents ahead—missing documents now result in canceled interviews.
  • Watch for communication from USCIS on new fees to avoid surprises.

Final Thoughts

These updates mark a significant shift in how Filipino applicants apply for U.S. visas. Proper planning, thorough documentation, and staying informed are now more critical than ever for success.

Planning to apply soon? Let us know your visa category and I can help craft a checklist tailored just for it!

✈️ How to Apply for a Japan Tourist Visa at VFS in the Philippines (2025 Edition)

Planning to visit Japan? Since April 7, 2025, all tourist visa applications from the Philippines must be processed via VFS Global’s Japan Visa Application Centres (JVACs). Here’s a complete, step-by-step guide to help you through the process—smooth and hassle-free.

1. What’s Changed?

Effective April 7, 2025, the Embassy of Japan shifted all tourist visa applications to VFS-operated centers. Accredited travel agencies no longer submit directly to the embassy.⎯ Visa centers aim to streamline service and reduce errors.

2. JVAC Locations & Hours

  • Metro Manila: Quezon City, Makati, Parañaque
  • Visayas and Mindanao: Cebu City, Davao City
  • Hours (Mon–Fri): Submission until 2 PM (Metro Manila), 12 NN (Cebu, Davao);
  • Passport pickup until 4 PM

3. Booking Your Appointment

  1. Create an account on the VFS Japan visa portal.
  2. Choose your desired JVAC location and visa type (Tourist – Single Entry)
  3. Book the appointment—slots fill fast. You’ll receive a confirmation email (print it!).

4. Required Documents

  • Valid Philippine passport
  • Completed Japan visa application form
  • Recent 45 × 35 mm color photo (plain background)—strict specs apply
  • Itinerary in Japan
  • Proof of funds (e.g., bank certificate, ITR)
  • PSA birth certificate (if applicable)

5. Fees to Prepare

  • Visa Fee: Free for Philippine nationals applying for tourist visa.
  • VFS Service Fee: PHP 520 (paid at the center)
  • Optional Add-ons: Premium lounge (~PHP 1,500), SMS updates, courier services.

6. On Appointment Day

  • Arrive ≥15 minutes early.
  • Bring printed confirmation, documents, and payment.
  • Submit your application—processing is typically fast (though queues may form).

7. Processing & Passport Collection

Processing usually takes 5–7 business days in Metro Manila; 10 business days in Cebu/Davao.⎯ Courier service available for home delivery.

8. Pro Tips for Smooth Processing

  • Apply at least 60 days before travel—slots fill quickly.
  • Use accurate keywords like “Japan tourist visa single entry Philippines” when searching online.
  • Double-check photo specs to avoid rejection.
  • Track your application via the VFS portal or SMS updates.

9. Final Reminder

All Japan tourist visa applications in the Philippines must be processed via VFS JVACs from April 2025 onward. No walk-ins. Appointment scheduling and complete documentation are essential for a successful application.

Good luck, and safe travels to Japan!